Harvest Paving and Landscapes Ltd
A driveway isn’t just a place to park your car. It’s the first thing people notice about your home, and it plays a big role in your property’s curb appeal. Over time, driveways take a lot of wear and tear from vehicles, rain, frost, and daily use. Cracks, stains, and fading are common, and if left untreated, they can shorten the lifespan of your driveway.
That’s why driveway sealing is so important. Sealing a driveway protects it from the weather, improves its appearance, and saves you money in the long run by preventing costly repairs. Whether you’re thinking of sealing a driveway yourself or hiring a professional driveway sealing service, this guide covers everything you need to know.
Tools and Materials You’ll Need to Seal a Driveway
Before you begin, make sure you have the right tools and materials:
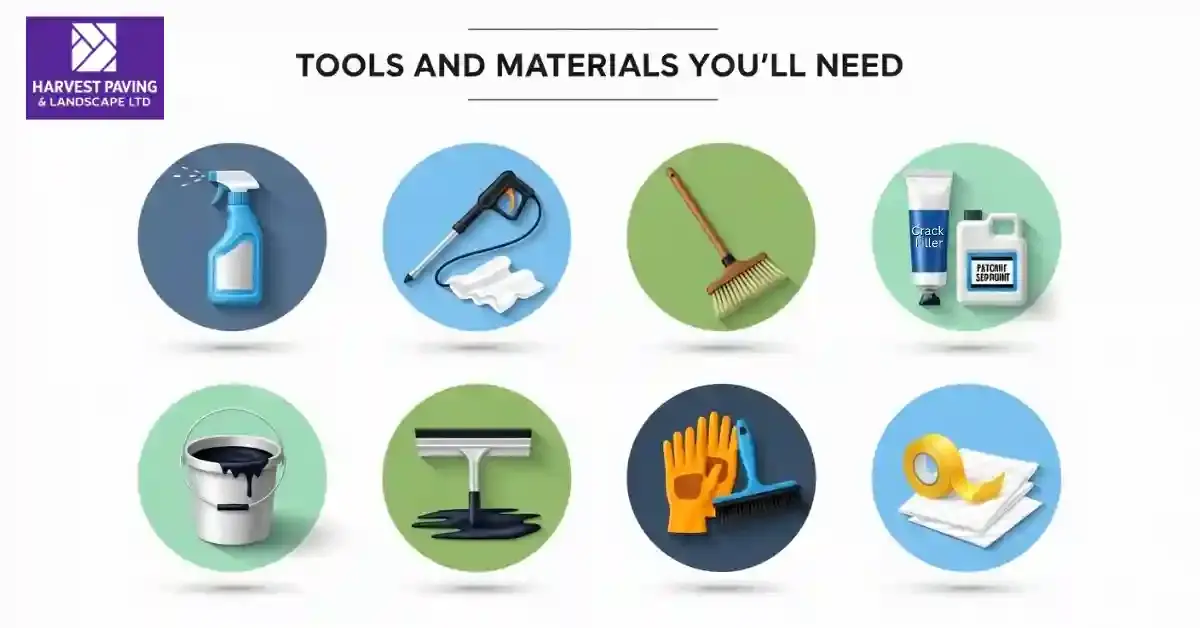
- Driveway cleaner or degreaser
- Pressure washer or stiff broom
- Crack filler or patching compound
- Sealant (choose asphalt or concrete type)
- Squeegee or driveway brush
- Protective gloves and clothing
- Painter’s tape or plastic sheets (to protect edges)
Before you begin, make sure you have all the necessary tools and materials ready for a smooth process.
If you’d rather not handle it yourself, consider hiring a professional paving and landscaping company that brings the right equipment and expertise to save you time and effort.
Step-by-Step Guide: How to Seal a Driveway
If you’re sealing a driveway yourself, here’s how to do it properly:
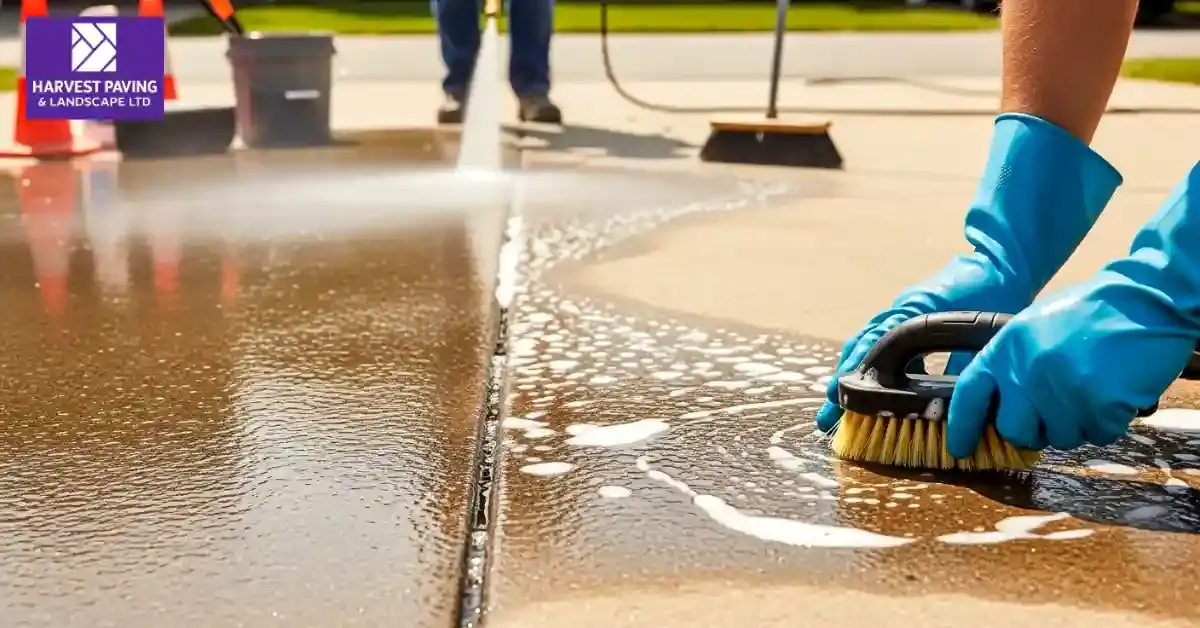
1. Clean the Surface Thoroughly
Before sealing a driveway, it’s important to make sure the driveway is completely clean. Sweep away leaves, dirt, and dust, and use a pressure washer for stubborn grime. Oil or grease stains should be treated with a degreaser so the sealant can stick properly. A clean surface helps the sealant bond evenly, giving your driveway a smooth and long-lasting finish
2. Repair Cracks and Holes
Before you seal a driveway, check for any cracks, holes, or uneven spots. Use a crack filler or patching compound to fix these areas so the surface is smooth and stable. If left untreated, small cracks can grow bigger and break through the sealant. Repairing damage first makes the seal last longer and keeps your driveway looking neat.
3. Block Off the Area
Once the surface is repaired and ready, block off the driveway to keep cars, people, and pets away. You can use cones, ropes, or temporary barriers to make sure no one walks or drives on the fresh sealant. This step is important because even small footprints or tire marks can ruin the finish. Keeping the area clear allows the sealant to set smoothly and evenly.
4. Mix the Sealant
Before applying, always mix the sealant well to achieve even consistency. Sealant can separate while sitting in the container, with heavier materials sinking to the bottom. Stirring or shaking ensures the liquid blends properly, which helps it spread evenly on the driveway. A well-mixed sealant gives better coverage and smoother, long-lasting finish.
5. Apply the First Coat
Pour a small amount of sealant onto the driveway and spread it evenly using a squeegee or brush. Work in small sections, moving in one direction to avoid streaks or overlaps. Make sure the layer is thin and smooth rather than thick, as this helps it dry properly. A well-applied first coat creates the base for strong protection and a clean finish.
6. Apply the Second Coat (If Needed)
After the first coat has dried completely, check if your driveway needs a second layer. Applying a second thin coat adds extra strength and protection, especially for older or paved driveways. Make sure the first coat is fully dry (usually 12–24 hours) before starting the second. This step ensures a smoother surface and a longer-lasting seal
7. Allow Proper Drying Time
Once sealing is done, let the driveway dry without any traffic or heavy objects on it. Most sealants need 24–48 hours to cure fully, depending on weather and product type. Avoid driving or walking on the surface during this time to prevent marks or damage. Proper drying ensures the seal coating driveway process hardens correctly, giving your driveway long-lasting protection.
When is the Best Time to Seal a Driveway?
Timing plays a big role in how well the sealant works.
- Season – The best time is in late spring or summer when the weather is warm and dry.
- Temperature – Ideally, the temperature should be between 15°C (60°F) and 30°C (85°F).
- After installation, New asphalt driveways need at least 6–12 months before sealing, so the surface can cure.
- Every few years – Seal your driveway every 2 to 3 years, depending on usage and Colchester weather conditions.

Tips for a Long-Lasting Seal
- Clean the driveway properly before sealing – Dirt, dust, and oil stains prevent the sealant from bonding well.
- Repair cracks and holes first – Filling gaps before sealing ensures a smooth and durable finish.
- Choose the right sealant – Use asphalt sealer for asphalt sealing driveways and concrete sealer for concrete surfaces.
- Apply thin, even coats – Two thin layers protect better than one thick coat, which may peel.
- Check the weather forecast – Avoid sealing driveway before rain or during cold, damp conditions.
- Allow proper drying time – Keep vehicles and heavy objects off the driveway for at least 24–48 hours.
- Don’t over-seal – Reseal every 2–3 years; sealing too often can cause cracking or flaking.
- Maintain the driveway regularly – Sweep debris, clean spills quickly, and fix small cracks to extend the seal’s life.
→ Regular cleaning, timely repairs, and resealing every few years will protect your driveway for years. Explore our services and book your professional maintenance today to keep every part of your property looking its best!
Common Mistakes to Avoid
- Skipping cleaning – Dirt or oil will prevent proper bonding.
- Applying thick layers – A thinner, even coat works better than a heavy one.
- Not fixing cracks first – Sealant is not a repair solution for deep holes.
- Sealing in cold or wet weather – Moisture and low temperatures reduce effectiveness.
Not sure which driveway material best fits your budget and style? Find out now: See different driveway types
Conclusion
Sealing a driveway yourself is one of the best ways to seal a driveway to protect your investment and keep your home’s exterior looking clean and fresh. With the right preparation and materials, you can easily do it yourself in a weekend, or if you prefer, hire a professional paving company to ensure a flawless, long-lasting finish. Whether you have an asphalt or sealed concrete driveway, following these steps will help you achieve a strong, smooth, and long-lasting finish.